


Posted 10/25/2021
What's a guest Wi-Fi network and why do you need one?
As most of us are aware, home network security is critical. If your Wi-Fi network is not adequately secured, it leaves you vulnerable to various security threats. Determined hackers can use your Internet service for free, introduce malware onto your devices, and steal your data. It's even possible for a hacker to hijack your Wi-Fi router and use it, along with thousands of other hacked routers, to launch a large-scale cyberattack on a company, government agency, or other organization.
Fortunately, these threats can usually be addressed with simple measures, like using the right type of Wi-Fi security (the WPA2 security protocol), setting a strong Wi-Fi password, and changing it every few months.
Your house guests may pose a threat to your home network
But there is another type of threat to your home network you may not be aware of your house guests. If your network is not set up correctly, visitors who access your Wi-Fi network pose a potential security risk to your devices and data.
Here's how to
Let's say that you have two laptops, four smartphones, and a tablet in your home, any of which could be connected to your Wi-Fi network at any given time. Let's say you also have several smart home devices connected to Wi-Fi, and you have a portable USB hard drive plugged into your Wi-Fi router to share files with other family members.
Whenever a guest logs into your primary Wi-Fi network, they will also have access to every one of these devices. While it's unlikely any of your friends would intentionally sabotage your network, there's a chance that the device they are using to connect to your network is infected with some malware. If so, there's a possibility that this malware could be spread to other devices connected to your network.
Why do you need a guest Wi-Fi network?
Fortunately, there's a simple way to address this particular threat. Most Wi-Fi routers give you the ability to create what's called a "guest Wi-Fi" network. Unlike your regular Wi-Fi network that you and your family members use, the guest Wi-Fi network restricts what your guests can do in your network. Specifically, it gives visitors access to your Internet connection and nothing else. They can't see any of your devices on the network and don't have the ability to access them. Most importantly, they can't accidentally introduce malware or compromise your devices or data in any other way.
How does a guest Wi-Fi network work?
Here's how a guest Wi-Fi network works. Anyone looking to connect to your Wi-Fi will see your primary Wi-Fi network name as well as your guest network name. For example, if your primary network is called "MyWiFi," your guest network might be called "MyWiFi-guest." Each of these networks has a separate strong password, one you share with guests and the other that you only share with family members. When a guest asks you for your Wi-Fi password, you give them the guest's Wi-Fi password and ask them to connect to "MyWiFi-guest." Once they're connected, they can use the Internet, and you don't have to worry about any security threats.
How to set up a guest Wi-Fi network
To set up your guest Wi-Fi network, you need to access the web interface for your Wi-Fi router. You log into the network and follow the instructions provided by your router manufacturer to create and set up the guest Wi-Fi network.
If you have a GigaCenter, you need to log in to the GigaCenter web interface to set up your guest Wi-Fi network. This involves three steps
-
Turn on the guest Wi-Fi network for the 2.4 GHz and 5 GHz bands.
-
Provide a name for the guest Wi-Fi network (also known as the SSID).3. Set a strong password that's also easy to remember for your guests.
How to log in to the GigaCenter Web Interface
Before setting up your guest network, you need to log in to your GigaCenter web interface. You do this on your personal computer using a browser like Chrome or Safari.
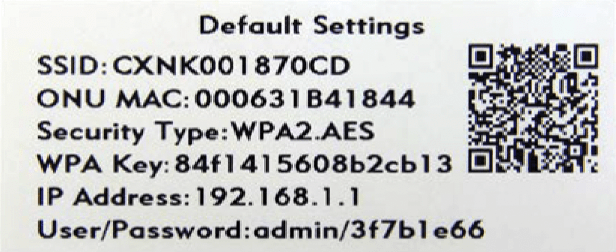
To access the web interface, you need the IP address of your GigaCenter and the user name (admin) and password. All of this information is printed on a label inside the box that your GigaCenter came in. The IP address is 192.168.ll, The default user name is "admin," and the unique password for your GigaCenter is printed on the label as shown in the example below.
Here's how you log into the web interface
- Open your browser (such as Chrome or Safari) and type "192.168.ll" into the address field Press Return.
- On the login screen that appears, type "admin" in the User Name field Type the password printed on the label in the Password field (In the example above, the password is "3f7bl e66".)
- Click the Login button.
How to change the name of your guest Wi-Fi network
You can set up two guest networks with the GigaCenter, one for the 2.4 GHz band and one for the 5 GHz band. These are already created in the web interface with a
default name that you can change to a name of your choice. By default, the guest Wi-Fi networks are turned off, so you have to turn them on using the web interface
Here's how to change the name of your guest Wi-Fi network
-
On the web interface home screen, click Wireless.
-
Click 2.4G Network on the side menu, then click SSID Setup.
-
From the dropdown beside the SSID (Network Name) field, select the default name of the 2.4GHz guest Wi-Fi network.
-
Click Enabled next to the SSID State field to turn on the 2.4 GHz guest Wi-Fi network.
-
In the Rename SSID field, type a new name for your 2.4GHz guest Wi-Fi network, such as "GuestWi-Fi2.4G".
-
Click Apply.
-
Click 5G Network from the side menu, then click SSID Setup.
-
From the dropdown beside the SSID (Network Name) field, select the default name of the 5 GHz guest Wi-Fi network.
-
Click Enabled next to the SSID State field to turn on the 5 GHz guest Wi-Fi network.
-
In the Rename SSID field, type a new name for your 5 GHz guest Wi-Fi network, such as "GuestWi-Fi5G".
-
Click Apply
How to change your guest Wi-Fi password
Once you have renamed the 2.4 GHz and 5 GHz guest Wi-Fi networks and turned them on, here's how to change the passwords
-
On the web interface home screen, click Wireless, then 2.4G Network.
-
Click Security.
-
From the dropdown beside the SSID (Network Name) field, select the name of the 2.4 GHz guest Wi-Fi network.4. Type your new strong password in the Secret field, then click Apply.
-
On the web interface home screen, click Wireless, then 5G Network.
-
Click Security.
-
From the dropdown beside the SSID (Network Name) field, select the name of the 5 GHz guest Wi-Fi network.
-
Type the same password you used for the 2.4 GHz guest network in the Secret field, then click Apply.
-
Click Logout
Share your guest password with your visitors.
Keep a record of your guest Wi-Fi password and make sure it's the password you share with visitors to your home, rather than your primary Wi-Fi password. And don't forget to change your primary and guest Wi-Fi passwords every few months.
If you have any problems changing the name of your guest Wi-Fi network or changing your password using the GigaCenter web interface, contact your service provider to get help.